Introducing PyMultiAuth - The ultimate Python Authentication Toolkit
Nowadays, whenever you enter a web application, chances are that it uses some API (REST or GraphQL). Why? Simply because APIs are very beneficial and cost-effective, but despite the numerous advantages that APIs bring to the table, there is one disadvantage that to me as a cyber security engineer outweighs all others: security.
When it comes to APIs, security is the number one concern that developers face. This concern is due to the multiple moving parts that they contain. What is more annoying is that it is tough to automate security checks, especially when there is authentication on the application. Entering the token manually every time, token expiring in the middle of scans, changing the token after every scan, the list of obstacles goes on and on, but what if they didn't exist?
What is PyMultiAuth?
PyMultiAuth is an open-source python library that allows users to authenticate and reauthenticate automatically. The way it works is that the user provides the library with a JSON file with specific configurations. The library will use this configuration, which differs according to the authentication method, to attempt authenticating and reauthenticating. We will explain below how to create these configuration files.
You can find the library in the following GitHub repository.
The Traditional Authentication Techniques
We will start by explaining how PyMultiAuth allows automatic authentication to APIs using the traditional authentication techniques: Basic authentication, authenticating through API key, and Digest authentication.
Basic Authentication
Basic authentication is an old authenticating technique where the user is asked for a username and password before accessing the APIs' endpoints. It can be seen in the image below.
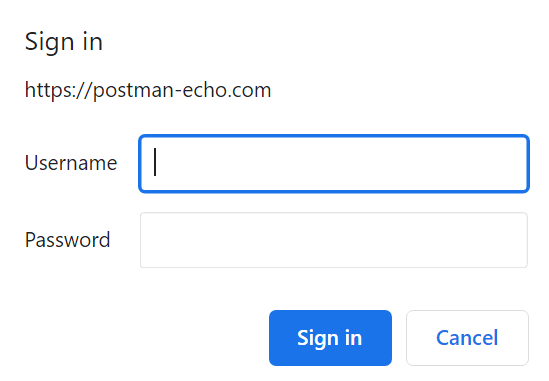
After entering the username and password, the web application concatenates them separated by a column (username:password) and then encodes them using base64. The resulting value is inserted into the HTTP header under the "Authorization" in the following format: Basic value.
The JSON configuration required for PyMultiAuth can be found on the following documentation page.
API Authentication
API authentication is simply authentication using an API key. So instead of manually adding the API key to every request sent, PyMultiAuth adds it to the header for you. You can also find the configuration on the documentation page.
Digest Authentication
Finally, we have digest authentication. In terms of how it appears to the user, digest authentication works the same as Basic Authentication, but it is different under the hood. While Basic authentication is authentication using a simple password, the base64 encoded value, Digest authentication is a challenge-response-based authentication.
A challenge-response authentication is an authentication in which the server sends a challenge, and the browser does some computations and sends back a response. If the response is correct, the user is allowed access to the web application.
The Digest authentication starts even before the prompt that asks the user for username and password appears. The first thing that happens is the browser sends to the web application or API an empty request to which the web application replies with a bunch of parameters necessary to log in (the challenge). After the user provides the web application with the username and password, the browser performs some computations using a hashing algorithm (the response). The browser then sends back the response with some other parameters. If the calculation is successful, the user is allowed entry.
The configuration for this can be found in the documentation pages as well.
Authenticating Using GraphQL Mutations? Yes, We Have It!
Many developers are shifting their APIs' architecture from REST to GraphQL. GraphQL is a querying language for APIs developed by Facebook in 2012. It was publicly released in 2015. So instead of using a different method for authenticating, many developers that use graphQL create an operation, usually a mutation, in their graphQL to authenticate the user.

Access Token and Refresh Token
The result of these mutations is usually a token that grants the user access to the API. These tokens in current APIs take the form of JWT tokens, but why do we have two tokens instead of one in the above example? The first token, also called an access token, is the user's token to access the API, but what about the second one? I will start answering by asking another question. How long should the access token be valid? Suppose the developer gives the access token a short lifetime. In that case, it will be annoying for the user to log in every time it expires. Suppose the developer provides the access token a long lifetime. In that case, if an attacker gains access to the token, he will have plenty of time to try to exploit the API. To solve this dilemma, another type of token is created, which is called a refresh token. Unlike the access token, the refresh token has a long lifetime and is used to generate more access tokens. So the access token is like a public key of the user with a very short lifetime (5, 10, 15 mins) that is used to access the resources provided by the API. A refresh token is like a user's private key with a very long lifetime (days, months, or even a year) that is used to get more access tokens.

Similar to the login mutation, there is also a token refresh mutation that takes an input, an access token, and returns an access token. The concept of access and refresh token isn't just seen in authentication through graphQL query but in all the following types of authentication. Similar to the above configuration, the configuration for this type of authentication (GraphQL authentication) is found on the documentation page.
JWT? What is That?
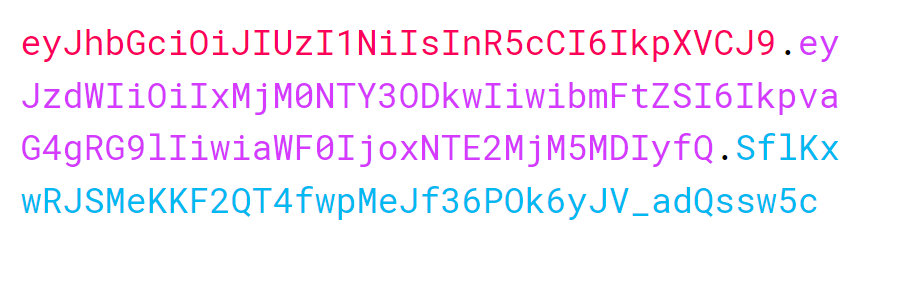
JWT, JSON Web Token, is a standardized token that holds some data that defines the user who wants to access the API (for example, username). Every token must be signed to protect against enumeration attacks and tokens forged by the attacker. Every token is divided into three parts. The first part is called the header, which usually contains the type of signing algorithm used and the type of token. The second part contains the data. Finally, the third part contains the actual signature.
Rest Authentication, a Multi-Use Authentication Mode
We will now be talking about REST authentication. Some people might be like, "Ow, since GraphQL authentication is authentication through GraphQL mutation, then rest authentication is authentication through REST endpoints." To those people, I will say, you are right and wrong. It is indeed an authentication that works with REST endpoints. Still, it also works with all endpoints that take as an input a JSON and return as output a JSON containing the access token and the refresh token. This authentication method is omnipotent, and I used it on soo many different occasions, even if the API I am testing is not using REST. The configuration for this method is found here.
OAuth Authentication
OAuth authentication is a standard designed to allow APIs or web applications to access resources hosted by other web applications on behalf of a user. It is used to authenticate users and to provide third-party authentications. The most notable example of OAuth authentication is when you log into a website using Google or GitHub. I won't dive deep into how the protocol works. In case you are interested, you can always check it out here. The most important thing to know is that there are five types in the OAuth authentication, also called "Grant Types," and they are:
- Authorization Code grant: It uses the complete OAuth schema and returns a single-use authorization code, which is used to get the access token and the refresh token. It is the recommended mode to use.
- Implicit grant: It is a simpler version of the authorization code where instead of returning the authorization code, it returns the access token and the refresh token directly.
- Client Credentials grant: Used usually for non-interactive applications
- Password grant: A very old way in which the user's username and password are used to authenticate.
- Refresh Token grant: This grant type isn't used to authenticate the user but instead to reauthenticate the user using refresh tokens.
You can find everything about using OAuth in PyMultiAuth on the following documentation page.
AWS Authentication
Finally, PyMultiAuth provides authentication to APIs that use AWS app sync, a service that AWS provides to host GraphQL APIs. Due to the complication of logging in, this method uses AWS APIs to authenticate the users. The configurations for this method can be found here.
None of the Above? Don't Worry; We Got You Covered.
Don't worry if your authentication method is not provided because PyMultiAuth has a solution. In this case, you can get an access token from your web application and enter it manually using the manual method.
CURL to Configuration File
Last but not least, let's say that you have a postman collection, and inside this postman collection, you have a request that you send to authenticate yourself. If you want to create a JSON configuration of that authentication in PyMultiAuth, you can copy the curl and use the curl_to_escaperc function inside PyMultiAuth itself to generate the JSON configuration. Though for now, this is limited to REST and GraphQL authentication.
Conclusion
And here you have it, a python module that authenticates and reauthenticate users automatically using any of the below methods:
- Basic Authentication
- API Authentication
- Digest Authentication
- GraphQL Authentication
- REST Authentication
- OAuth Authentication
- AWS Authentication
- Manual Authentication