How to Implement Multi-User Testing in DAST: Real-World Examples
Discover how to test for multi-user vulnerabilities. Four real-world examples of tenant isolation, consolidated testing, and privilege escalation.

Modern applications are multi-user by design and handle millions of concurrent users, shared resources, and complex role models. Yet most DAST tools still test applications as if only one user exists.
Traditional DAST tools crawl applications sequentially, validating endpoints as if one user were clicking through the app. This approach misses critical vulnerabilities that only appear under conditions of concurrency or multi-user interactions.
These gaps are not theoretical. In 2024, bug bounty platforms like HackerOne recorded an average of more than 6 reports per month related to multi-user vulnerabilities. Moreover, it's noted that high payouts often correspond to vulnerabilities involving permission bypass and privilege escalation, reflecting the elevated value of these security flaws.
Legacy DAST tools leave entire classes of vulnerabilities undetected, especially:
- Race Conditions: duplicated transactions, state corruption, …
- BOLA: leading cross-user or cross-tenant data access
- Broken tenant isolation: exposing one company data’s to another
- Privilege Escalation: a lower role successfully replays admin requests
A modern DAST that supports multi-user testing is essential to uncover these issues early, before they reach production.
This guide walks through four common real-world multi-user vulnerabilities in web apps, using practical examples to show exactly how these attacks happen and how multi-user DAST testing can stop them.
Real-World Examples of Multi-User Vulnerabilities
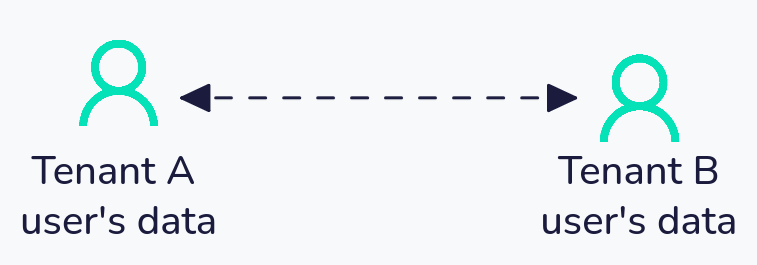
Case 1: Tenant isolation failure allowing cross-tenant data access
Real-World Example: U.S. Dept Of Defense
According to HackerOne’s report 2623715, a misconfigured Salesforce instance allowed any authenticated user to download attachments belonging to other users through the registration form.
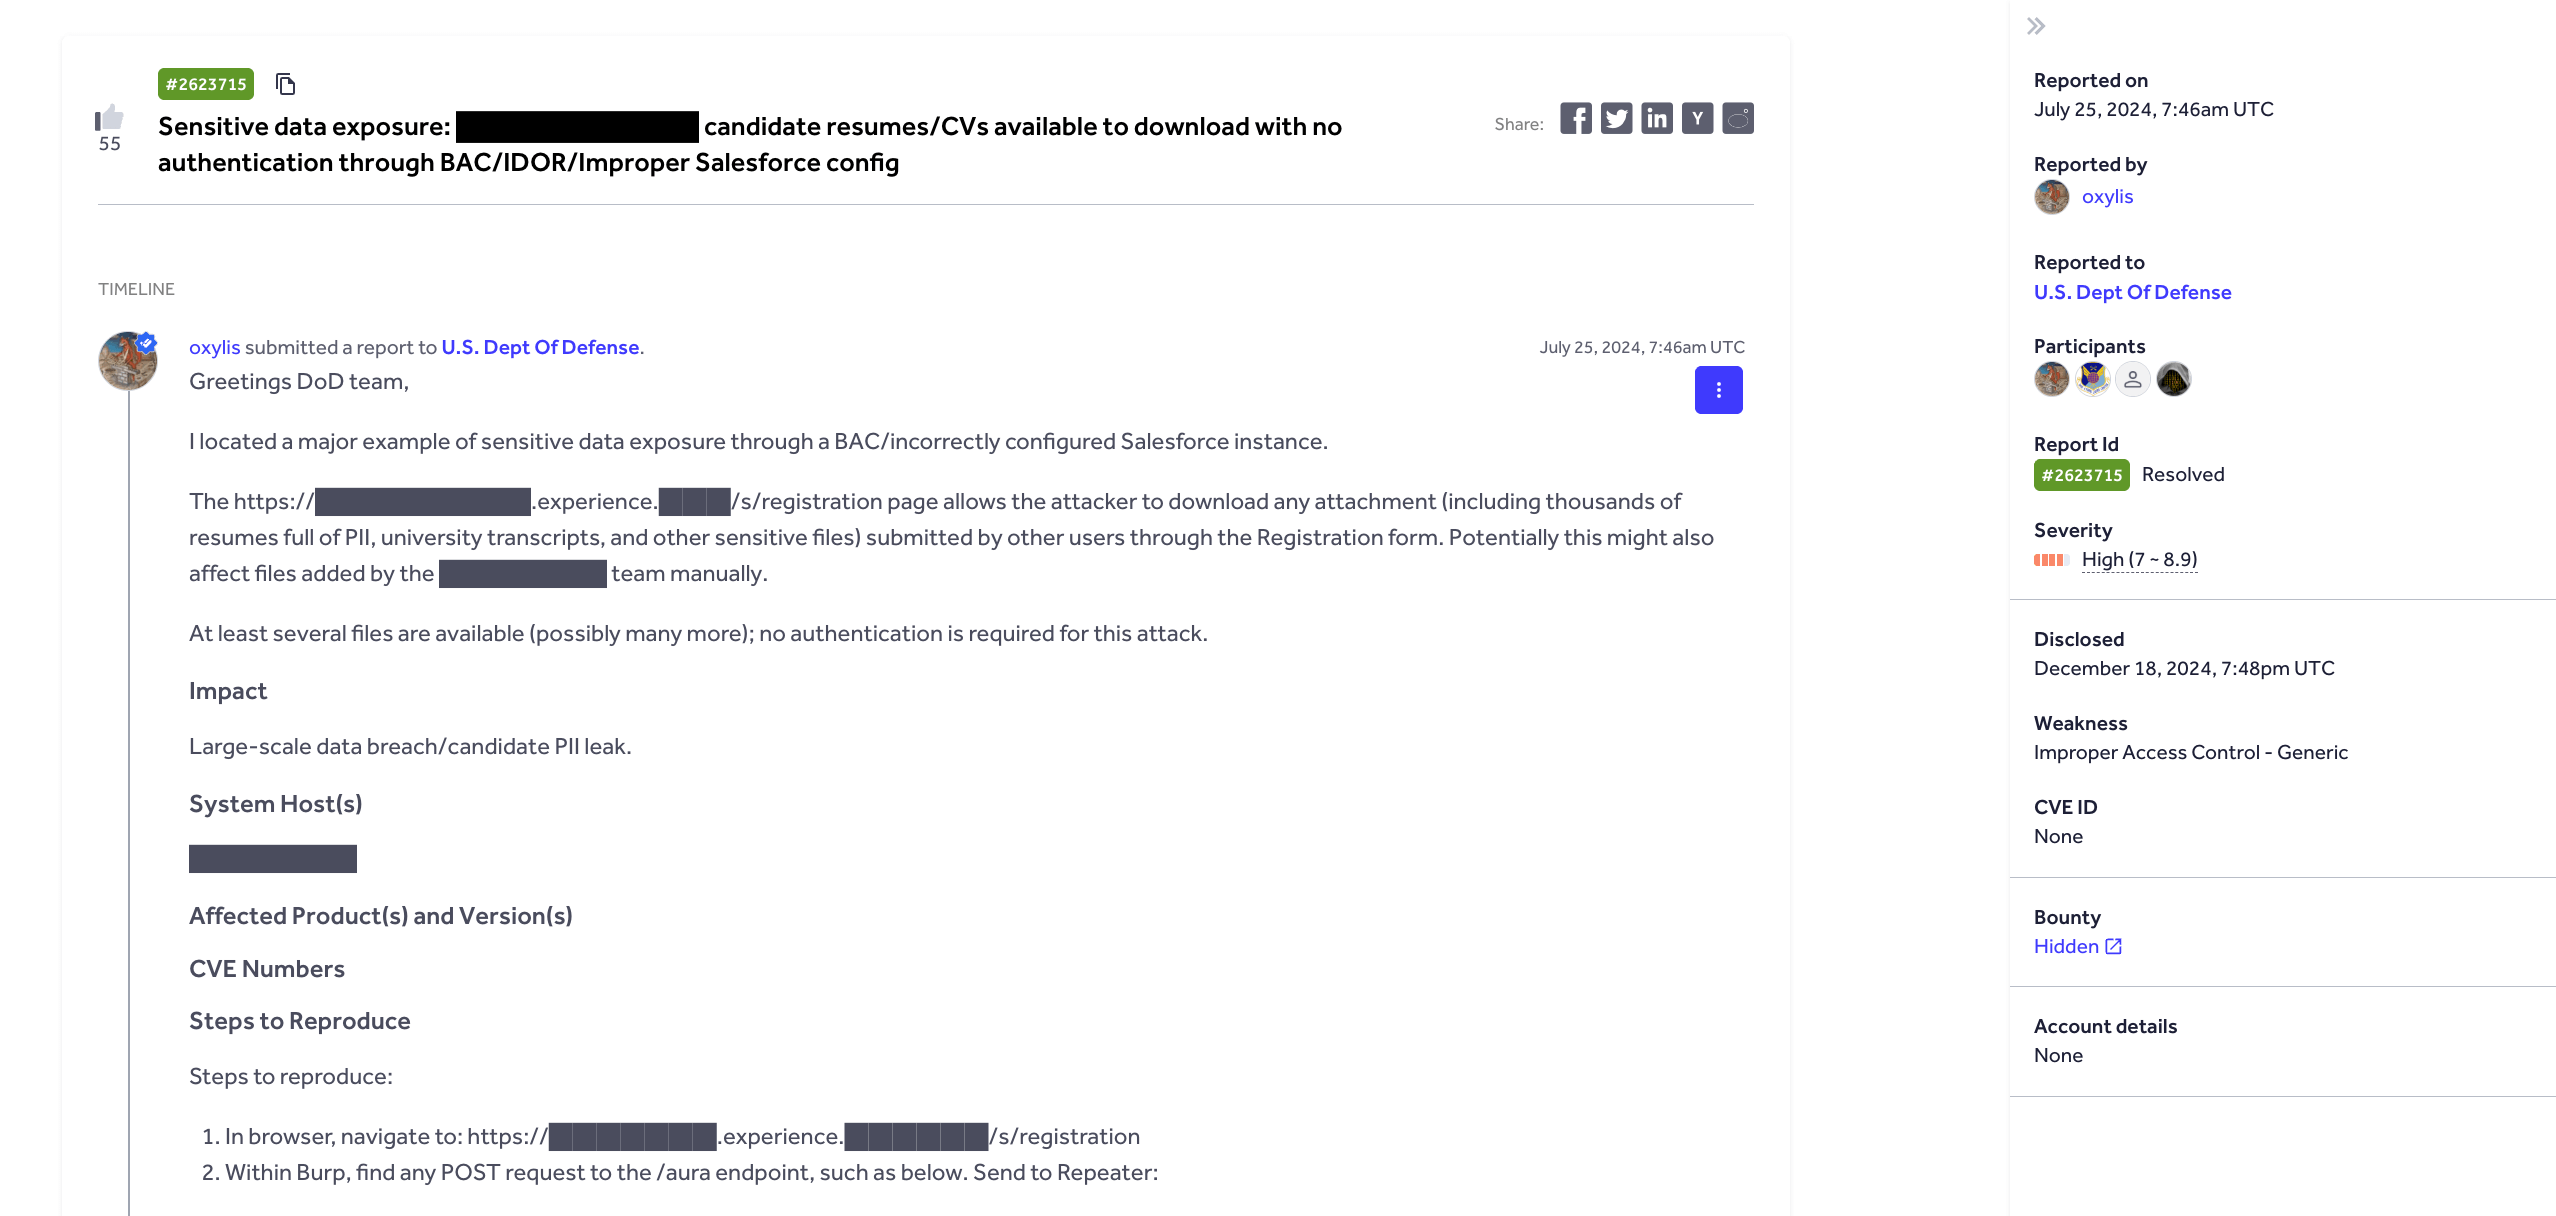
By modifying a request, any authenticated user can download attachments that belong to other users via the registration form. An attacker could also enumerate attachment IDs and retrieve private resumes belonging to other users across tenants.
Using Escape DAST, we can easily test this vulnerability by configuring two users from different tenants with equivalent roles and then test whether either can access the other’s data by modifying tenant or object identifiers
Setting the test up
First, set up two users from different customer accounts with equivalent permissions:
authentication:
  presets:
    - type: browser_agent
      users:
        - username: user@tenant-a.com
          password: TenantAPassword123!
          main_user: true
      login_url: https://app.company.com/tenant-a
    - type: browser_agent
      users:
        - username: user@tenant-b.com
          password: TenantBPassword456!
      login_url: https://app.company.com/tenant-b

frontend_dast:
  max_duration: 180
  static_crawling:
    enabled: true
    time_limit_seconds: 300
  agentic_crawling:
    enabled: true

security_tests:
  tenant_isolation:
    skip: false
    main_user: user@tenant-a.com
Let us explain how this test works,
Discovery Phase: We log in as user@tenant-a.com and explore the application
- Navigate through dashboards, reports, and settings
- Interact with documents, projects, and customer data
- Capture all API requests and data access patterns
Isolation Testing: We replay every action using user@tenant-b.com credentials
- Same API endpoints, different authentication
- Same URL patterns, different tenant context
- Same operations, different user session
Violation Detection: We flag any successful cross-tenant access
- Tenant-b admin can view tenant-a’s dashboard → Critical Violation
- Tenant-b admin can download tenant-a’s reports → Critical Violation
- Tenant-b admin receives “Access Denied” → Pass
Below you can find an example of how this vulnerability is shown within the Escape platform after the test is set up and run:
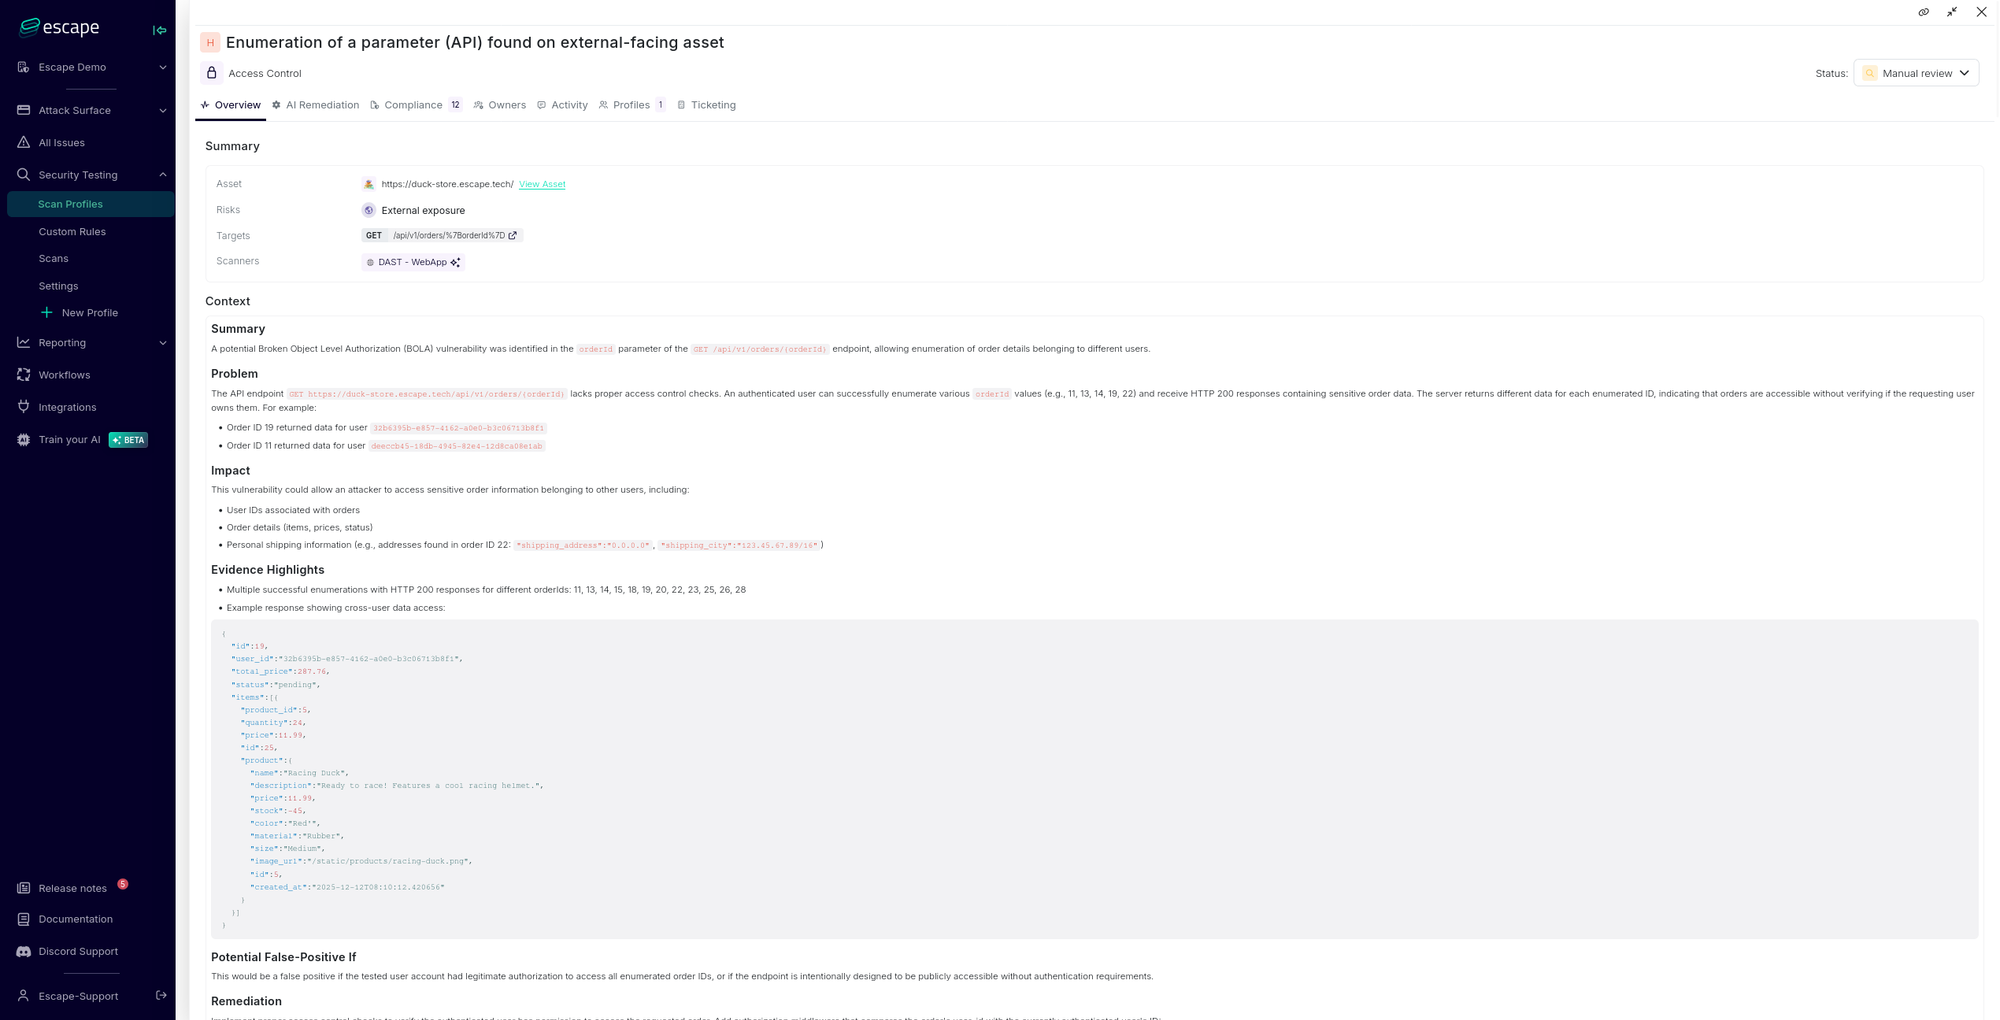
What this test usually prevents
In multi-tenant systems, users may share the same role or permissions, but they must never access data belonging to another organization. When tenant boundaries fail, the impact is immediate: data leaks, compliance violations, and loss of customer trust.
Other real-world examples include:
- Healthcare SaaS: Doctor at Hospital A views patient records from Hospital B
- Financial Platform: Accountant at Company A exports Company B’s financial statements
- HR Software: Manager at Corporation A accesses employee salary data from Corporation B
Even when users have identical roles (both admins, both managers, both read-only users), tenant isolation must always be enforced. This test ensures those boundaries hold under real multi-user conditions.
How to prevent this vulnerability during development
Have you found this vulnerability in your environment?
Here is a quick overview of how it can be remediated and prevented:
- Tenant context must come from authentication, never from query params
- Every database query must include
WHERE tenant_id = user.tenant_id - Use UUIDs instead of enumerable IDs (1, 2, 3...)
Case 2: Privilege Escalation, allowing a user to gain new access
Real-World Example: Lichess
According to HackerOne's report 2130385, Lichess.org contained a privilege escalation vulnerability that allowed newly created accounts to bypass eligibility restrictions and create blog posts, a feature reserved for established accounts.
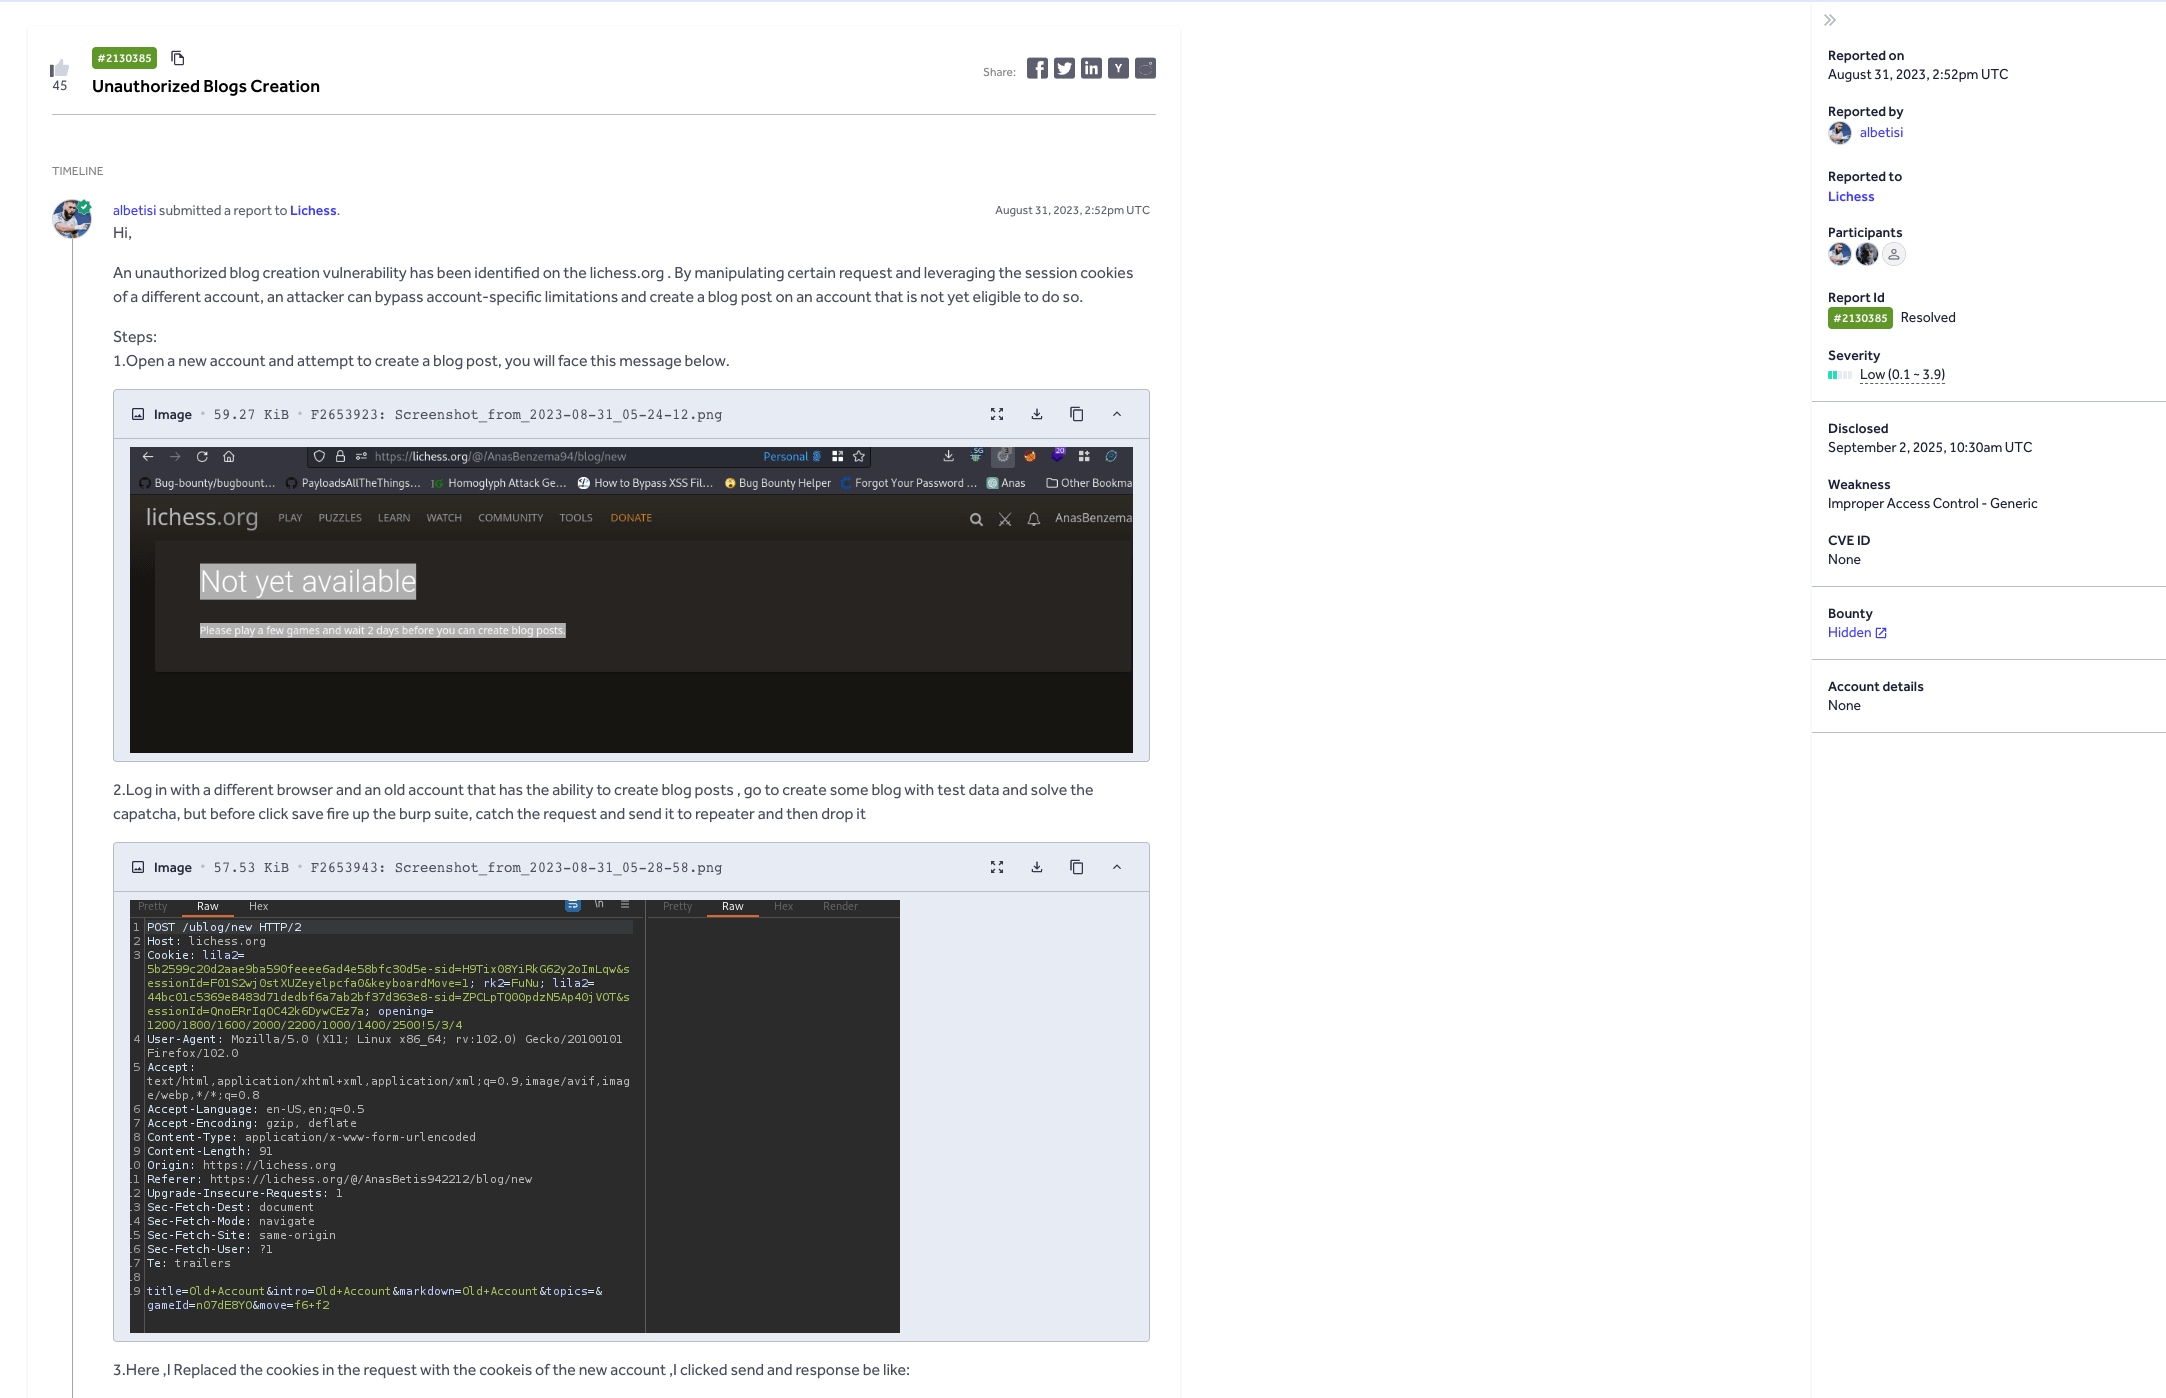
New Lichess accounts must play games and wait a minimum period before gaining blog creation privileges. However, an attacker could bypass this by:
- Initiating blog post creation with an eligible account
- Intercepting the HTTP request before submission
- Replacing the session cookies with those from a new ineligible account
- Successfully creating a blog post under the restricted account
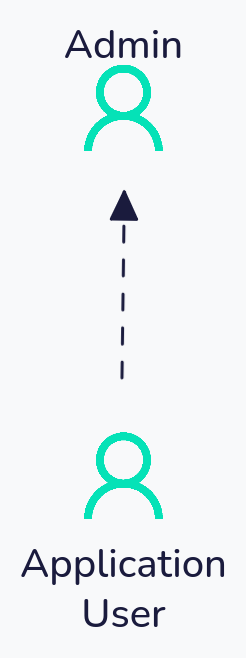
Using Escape, this vulnerability would be detected by configuring an established account with blog privileges as the main_user and a newly created account as the secondary user.
The test would replay all blog creation operations using the new account's credentials, immediately flagging when the ineligible account successfully executes operations that should be restricted based on account age and activity requirements.
Setting the test up
First, set up two users with asymmetric permissions in the same tenant:
authentication:
  presets:
    - type: browser_agent
      users:
        - username: admin@company.com
          password: SecurePassword123!
          main_user: true
        - username: standard_user@company.com
          password: StandardPassword456!
      login_url: https://app.company.com/login

frontend_dast:
  max_duration: 180
  static_crawling:
    enabled: true
    time_limit_seconds: 300
  agentic_crawling:
    enabled: true

security_tests:
  tenant_isolation:
    skip: false
    main_user: admin@company.com
    natural_language_rule: |
      Ensure that standard users cannot access administrative features
      including user management, billing configuration, and system settings.
      Standard users should not be able to view or modify admin-only resources.
Here, we decided to set up instructions via natural_language_rule. Natural language rules are a set of instructions in simplified "human-like" language that help the Escape algorithm process, interpret actions, and generate appropriate detection logic tailored to the specified use case. To learn more about how natural language rules are used in Escape, jump further down the article.
Let us explain how this test works,
Discovery Phase: We log in as admin@company.com and explore the application
- Navigate through administrative dashboards, user management panels, and system settings
- Access billing configuration, audit logs, and privileged operations
- Capture all API requests and data access patterns exclusive to admin users
Escalation Testing: We replay every admin action using standard_user@company.com credentials
- Same administrative endpoints, different authentication level
- Same privileged operations, lower-privilege session
- Same restricted resources, unprivileged context
Violation Detection: We flag any successful unauthorized access
- Standard user can access the admin dashboard → Critical Violation
- Standard user can modify billing settings → Critical Violation
- Standard user receives “403 Forbidden” on admin endpoints → Pass
What this test usually prevents
Other real-world examples include:
- Corporate Platform: Junior employee can delete company-wide records
- SaaS Application: read-only viewer can modify billing settings and subscription plans
- Content Management: Contributor can publish or delete any content, bypassing editorial workflow
The key difference from Case 1 is that users have different permissions levels within the same tenant.
How to prevent this vulnerability during development
Have you found this vulnerability in your environment?
Here is a quick recap of how it can be remediated and prevented:
- Never trust role values from the client, validate server-side
- Business eligibility rules (account age, usage limits) must be enforced in the service layer
- Sessions must be tied to a single user context
Case 3: Multiple Secondary Users (Consolidated Testing)
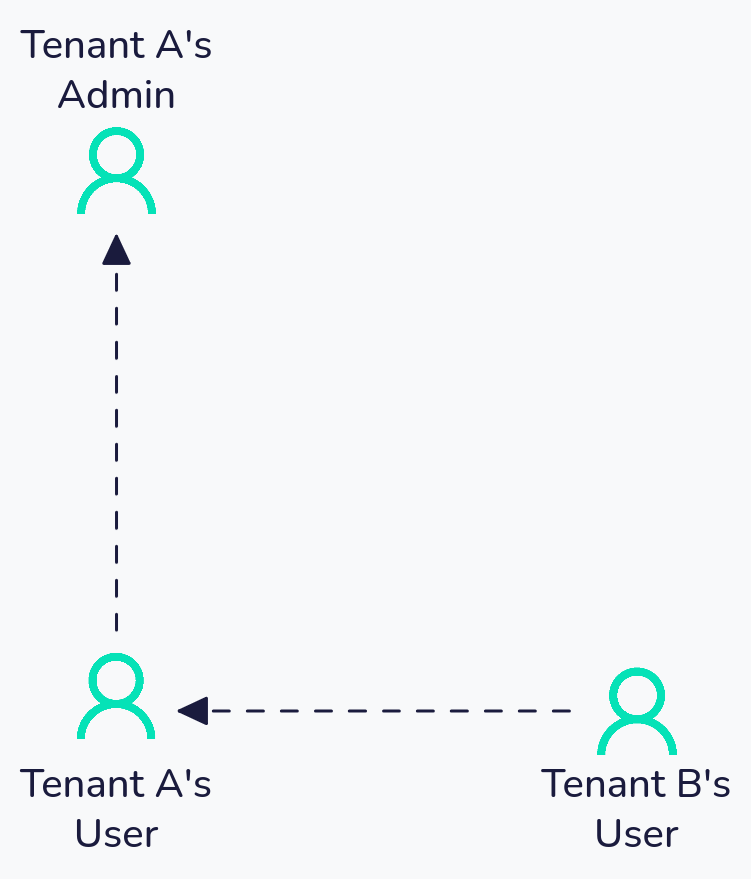
This case is almost a mix of the first two cases. At the same time, we are checking for privilege escalation between a user in Tenant A and an admin in Tenant A, as well as verifying tenant isolation between Tenant A and Tenant B.
Real-World Example: Shopify
According to HackerOne's report 2207248, Shopify had a vulnerability that allowed staff members to access information from shops they were not authorized to manage, due to an IDOR. By using a simple GraphQL query, a staff account without permissions on a target shop could access another shop’s billing details, including sensitive financial data.

With Escape, this vulnerability could be automatically detected by configuring test accounts, such as a shop owner as main_user, a user within the same shop, and a staff member in a second shop.
Escape would then replay shop operations using the credentials of each new account, immediately flagging any case where an unauthorized account successfully performs actions that should be restricted by permission requirements.
Setting the test up
To get started setting the test up, you can use the following configuration:
authentication:
  presets:
    - type: browser_agent
      users:
        - username: privileged_user@tenant-a.com
          password: PrivilegedPassword123!
          main_user: true
        - username: standard_user@tenant-a.com
          password: StandardPassword456!
      login_url: https://app.company.com/tenant-a
    - type: browser_agent
      users:
        - username: user@tenant-b.com
          password: TenantBPassword789!
      login_url: https://app.company.com/tenant-b

frontend_dast:
  max_duration: 180
  static_crawling:
    enabled: true
    time_limit_seconds: 300
  agentic_crawling:
    enabled: true

security_tests:
  tenant_isolation:
    skip: false
    main_user: privileged_user@tenant-a.com
    natural_language_rule: |
      Ensure that users from other tenants cannot access Tenant A's data.
      Additionally, ensure that standard users within Tenant A cannot access
      privileged user features such as organization settings and billing.
Let us explain now how this test works:
Discovery Phase: We log in as privileged_user@tenant-a.com and explore the application
- Navigate through all features accessible to the privileged account
- Access both tenant-specific data and role-specific administrative functions
- Capture the full scope of privileged operations
Multi-Vector Testing: We replay every action using both secondary users
standard_user@tenant-a.comattempts to access privileged features (Privilege Escalation testing — same tenant, different roles)user@tenant-b.comattempts to access Tenant A’s data (Tenant Isolation testing — different tenants)
Violation Detection: We flag any successful unauthorized access from either user
- Standard user accesses organization settings → Privilege Escalation Violation
- Tenant B user views Tenant A’s reports → Tenant Isolation Violation
- Both users receive appropriate access denials → Pass
Important Limitations:
Access control testing via configurations in Escape is performed exclusively in one direction: from Other Users toward the Main User. This means:
standard_user@tenant-a.comaccess touser@tenant-b.comdata is NOT tested- If
user@tenant-b.comhas access to features not accessible to the Main User, those features will NOT be tested.
To learn more about the unidirectional testing model and its limitations, check out our documentation.
What this test usually prevents
Other real-world scenarios you can encounter:
- Enterprise SaaS: A standard employee in your organization accesses admin-only configuration, while a competitor’s user accesses your company’s data through the same vulnerability
- Healthcare Platform: A nurse escalates to doctor-level access while a different hospital’s staff can view your patient records
- Multi-tenant CRM: A sales rep gains manager permissions while another company’s sales team can export your customer database
This pattern catches both vertical (privilege escalation) and horizontal (tenant isolation) authorization failures in a single scan.
How to prevent it in development
Have you found this vulnerability in your environment?
Here is how it can be remediated and prevented:
- Tag every resource with both owner AND tenant
- Apply access checks inside GraphQL resolvers, not after data fetch
- Test API responses with multiple users to verify isolation
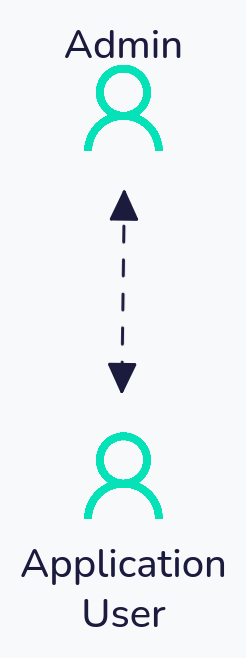
Case 4: Bidirectional Privilege Escalation Testing
Real-World Example: Shopify
According to HackerOne's report 1010835, Shopify had an issue where a staff member without explicit permissions on a shop would be able to export a limited summary of charges made to that shop's billing account by Shopify and Shopify apps.
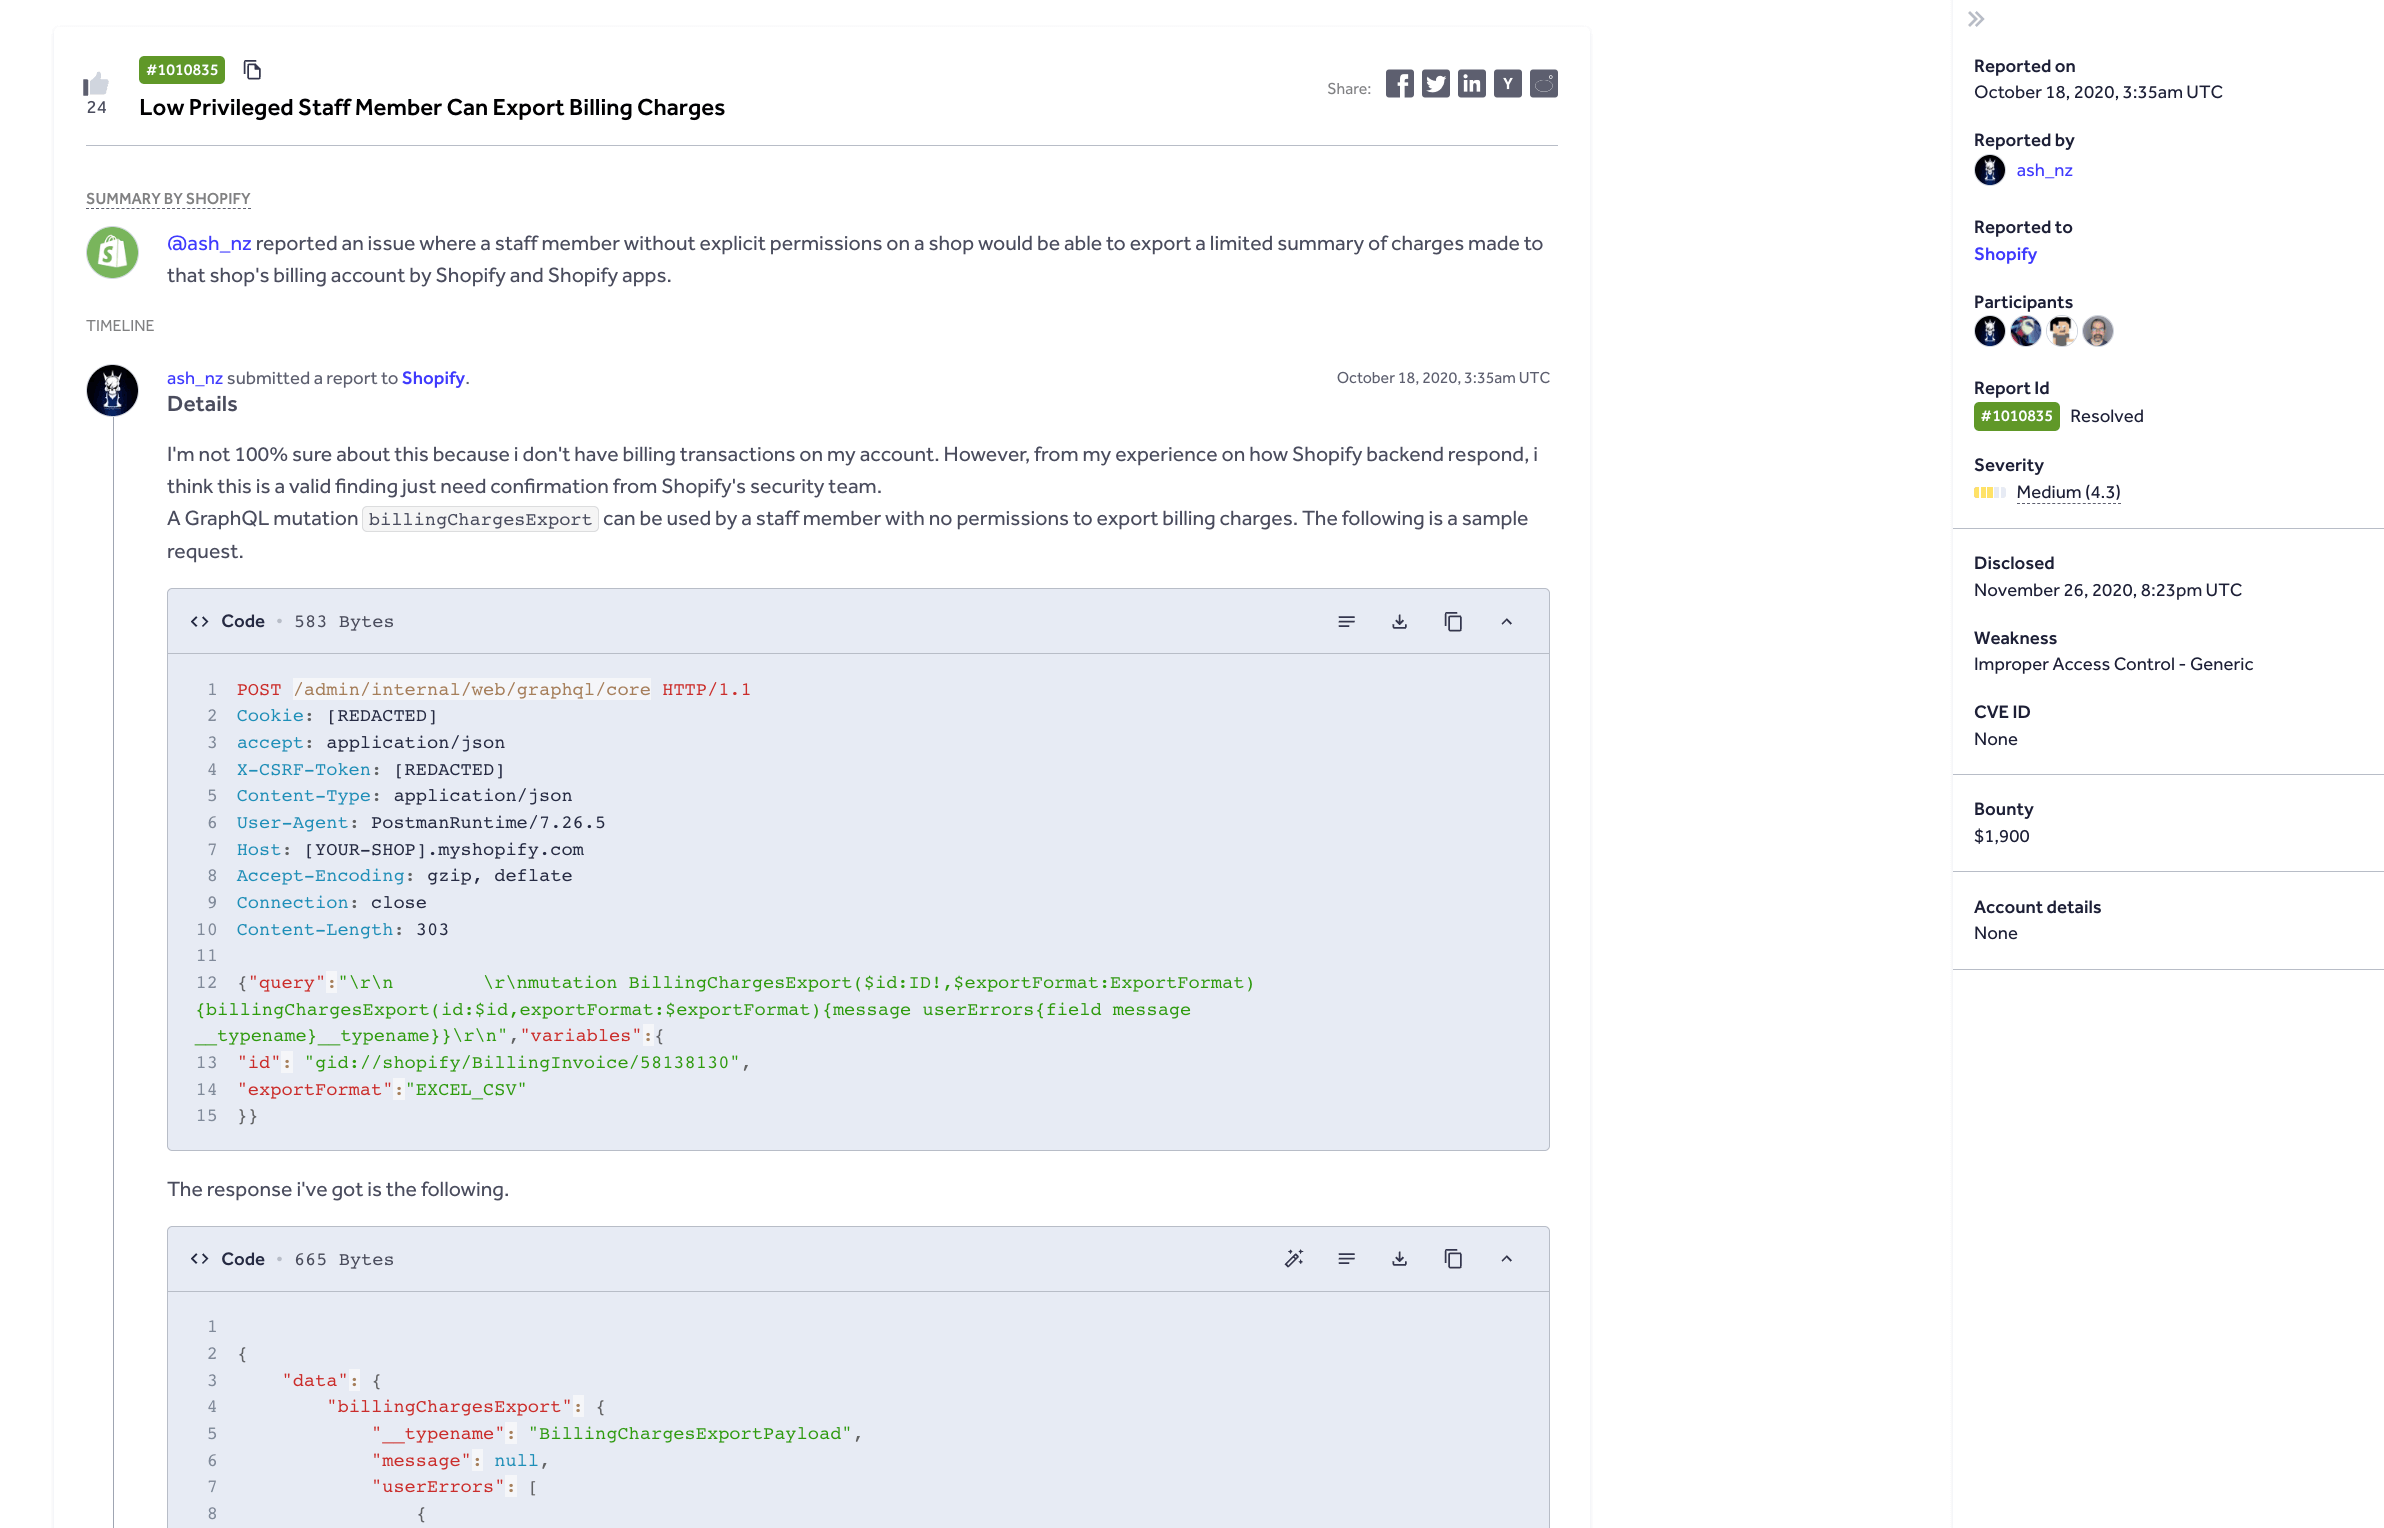
By simply using a GraphQL mutation, a staff member without permissions can easily export billing charges.
Using Escape, this vulnerability would be detected by configuring a shop owner as main_user and a staff member without permission as the secondary user. The test would replay all shop operations using the new account's credentials, immediately flagging when the ineligible account successfully executes operations that should be restricted based on permissions requirements.
Setting the test up
Two separate scan profiles must be configured to achieve full bidirectional coverage:
Scan Profile A Configuration (Testing upward escalation):
authentication:
  presets:
    - type: browser_agent
      users:
        - username: admin@company.com
          password: AdminPassword123!
          main_user: true
        - username: manager@company.com
          password: ManagerPassword456!
      login_url: https://app.company.com/login

frontend_dast:
  max_duration: 180
  static_crawling:
    enabled: true
    time_limit_seconds: 300
  agentic_crawling:
    enabled: true

security_tests:
  tenant_isolation:
    skip: false
    main_user: admin@company.com
    natural_language_rule: |
      Ensure that managers cannot access administrative features such as
      user role assignment, security settings, and audit logs.
Scan Profile B Configuration (Testing downward leakage):
authentication:
  presets:
    - type: browser_agent
      users:
        - username: manager@company.com
          password: ManagerPassword456!
          main_user: true
        - username: admin@company.com
          password: AdminPassword123!
      login_url: https://app.company.com/login

frontend_dast:
  max_duration: 180
  static_crawling:
    enabled: true
    time_limit_seconds: 300
  agentic_crawling:
    enabled: true

security_tests:
  tenant_isolation:
    skip: false
    main_user: manager@company.com
    natural_language_rule: |
      Ensure that administrators cannot access manager-specific private data
      such as personal performance reviews, team communications, or draft documents.
Let us explain how this test works,
Scan Profile A: Tests whether managers can access admin-restricted features
- Crawls the application as admin, discovering all administrative functions
- Replays admin actions with manager credentials
- Flags any successful privilege escalation
Scan Profile B: Tests whether admins can access manager-private data
- Crawls the application as manager, discovering manager-specific private areas
- Replays manager actions with admin credentials
- Flags any unauthorized access to private data
Why are both scans required?
In privilege escalation scenarios with asymmetric permissions, attack surfaces can be bidirectional. The admin may have access to endpoints that inadvertently leak manager-private data, while the manager may have access to different endpoints that could be exploited for privilege escalation. Only bidirectional testing detects both vulnerability classes.
What this test usually prevents
Other real-world scenarios you can encounter:
- HR Platform: Admin user can view employee private notes that should be visible only to the employee themselves
- Banking Application: The bank manager can access customer's personal messages intended only for the customer
- Project Management: The organization owner can read private drafts that team members haven’t shared yet
In systems with complex permission hierarchies, both directions of access need validation.
How to prevent this vulnerability during development
Have you found this vulnerability in your environment?
Here is how it can be remediated and prevented:
- Test both directions: low→high privilege AND high→low private data
- Lock sensitive fields, not just endpoints
- Deny by default—if ownership isn't validated, fail the request
Three Ways to Customize Multi-User Testing
Escape provides three configuration strategies for multi-user access control testing, each suited to different levels of specificity and customization requirements. All configurations are supported in both API security testing and Web App security testing modes and apply to both Tenant Isolation and Privilege Escalation testing scenarios.
Escape supports multi-user testing out of the box via fingerprinting, but we understand that no application is created equal, and to avoid contextually invalid findings, customizations allow customers to refine and improve the accuracy of the results. For applications with highly complex business logic, we recommend manually defining detailed rules that can be adjusted across different scan profiles. When needed, the Escape support team provides detailed guidance and assists with setup.
For example, two roles may both access a data type by design, but only one should access another. Defining these rules is what reduces noise and makes results meaningful — and the three configuration approaches exist to support that.
Natural Language Rule Generation
Escape’s AI pentesting configuration system enables access control rules to be defined through natural language descriptions. An LLM analyzes the provided description and generates appropriate detection logic tailored to the specified use case, whether testing Tenant Isolation or Privilege Escalation.
Let’s take a quick example, suppose that we have a notes app.
So, we can easily define our rule in natural language: we want only the owner of a note to have access to it, and no one else. We can then easily set it up using natural_language_rule:
security_tests:
  tenant_isolation:
    main_user: 'user1' # Primary user for exploration and baseline establishment
    natural_language_rule: |
      Ensure that a user's notes cannot be accessed by other users.
Here, we are checking that we have proper tenant isolation between each user, and it’s not possible to access each other's notes.
Because modern applications are more and more complex, you may be interested in XML prompting.
It’s also possible to write more complex tests, using XML prompting to structure your rules clearly:
security_tests:
  tenant_isolation:
    main_user: 'user1'
    natural_language_rule: |
      <isolation_rules>
        <rule priority="critical" category="data_access">
          User's private notes and documents must never be visible to other users.
          Check both the note content and metadata (title, created_at, author).
        </rule>
        <rule priority="high" category="resource_ownership">
          Each user should only see their own:
          - Projects and project members
          - API keys and authentication tokens
          - Billing information and payment methods
        </rule>
        <rule priority="medium" category="organization_isolation">
          Within multi-organization contexts, ensure that:
          - Organization A users cannot access Organization B's resources
          - Shared resources are explicitly marked and properly scoped
        </rule>
      </isolation_rules>

      <exceptions>
        <allowed>Public profiles and usernames are intentionally shared across users</allowed>
        <allowed>Shared workspace resources with explicit collaboration permissions</allowed>
        <allowed>System-wide notifications and announcements</allowed>
      </exceptions>

      <detection_hints>
        Look for user IDs, tenant IDs, or organization IDs in API responses.
        Pay special attention to list endpoints that might leak other users' data.
        Check if filtering by user/tenant parameters is properly enforced.
      </detection_hints>
Here we are defining all the rules in <isolation_rules>, we can also define some exceptions in exceptions and help the LLM using detection_hints.
To view the generated detection rules from your natural language input, search for [Agentic - Tenant Isolation] in the scan logs tab.
Default Fingerprint-Based Detection
Escape’s default configuration employs response fingerprinting to automatically detect authorization failures across the majority of API architectures without requiring custom rule definition. This approach is effective for both Tenant Isolation and Privilege Escalation testing.
security_tests:
  tenant_isolation:
    main_user: 'user1' # Primary user for exploration and baseline establishment
    other_users:
      detect: # Conditions that indicate broken tenant isolation
      # Triggers when authenticated requests return identical response fingerprints across users
      - if_: request.is_authenticated
        is_: true
      - if_: helpers.fingerprints.same
        is_: true
This approach compares response fingerprints between the main user and secondary users. When authenticated requests return identical response fingerprints across users who should have isolated data, the system flags a potential authorization failure. It works well for most standard API architectures where user-specific data should produce distinct responses.
Before taking action on any page or path, Escape DAST fingerprints the application's current state. This process allows the system to determine whether exploring a particular route is likely to uncover new, valuable findings or if it would be redundant. As a result, Escape DAST optimizes scanning performance by focusing on high-risk areas while skipping paths with minimal chances of revealing additional vulnerabilities.
Custom Detection Rules (Precision Targeting)
For complex scenarios where responses contain expected per-user variations (timestamps, user-specific metadata, localization data) but specific data elements must remain isolated based on user identity or privilege level, custom detection rules enable precision targeting of authorization boundaries.
Let’s take a quick example, suppose that we have a notes app,

We can easily check the response for a regex or JSON expression:
security_tests:
  tenant_isolation:
    main_user: user1
    other_users:
      detect:
        # JSON path-based detection: Validates specific fields remain distinct across users
        - if: helpers.json_matches.all
          jq: '.notes[].content'  # Extract note content from all notes in response
          is: true  # Trigger if extracted values are identical across users
        # Regex-based detection: Identifies presence of user-specific data in other users' responses
        - if: helpers.regex_matches.all
          regex: '.*User 1 Private Note.*'  # Pattern matching sensitive data
          is: true  # Trigger if pattern found in both users' responses
Custom detection rules give you fine-grained control when fingerprinting falls short. Use JSON path expressions (jq) to extract and compare specific fields, or regex patterns (regex) to detect sensitive data leaking into unauthorized responses. This is particularly useful when responses contain expected per-user variations (timestamps, localization data) but specific elements must remain strictly isolated.
How to Choose the Right Configuration For Multi-User Testing
Picking the correct testing pattern depends on your application architecture and security requirements:
| Pattern | Use When |
|---|---|
| Tenant Isolation (Case 1) | Multi-tenant SaaS where users from different organizations must never see each other’s data |
| Privilege Escalation (Case 2) | Single-tenant apps with role-based access control (admin, manager, viewer) |
| Multiple Secondary Users (Case 3) | You need both tenant isolation and privilege escalation testing in one scan, and your privileged user has the broadest feature access |
| Bidirectional Testing (Case 4) | Complex permission hierarchies where higher-privilege users might inadvertently access lower-privilege private data |
For detection rules:
- Natural Language Rules: Start here when you want fast setup, and your access control logic is describable in plain terms
- Default Fingerprinting: Use when your API returns clearly distinct responses per user and you want zero-configuration detection
- Custom Detection Rules: Use when responses contain expected variations (timestamps, metadata) but specific fields must remain isolated
How to Verify Multi-User Testing Results in Escape Logs
Even after you’ve configured and run a multi-user test, another challenge remains: understanding which actions each user actually took and whether the test exercised the paths you expected.
That’s where Escape’s detailed Coverage Logs come in. For every endpoint the test interacted with, for example, you can inspect the logged traffic and see exactly which requests were sent by which user, making it easy to verify that coverage was complete and that each role stayed within its intended scope:
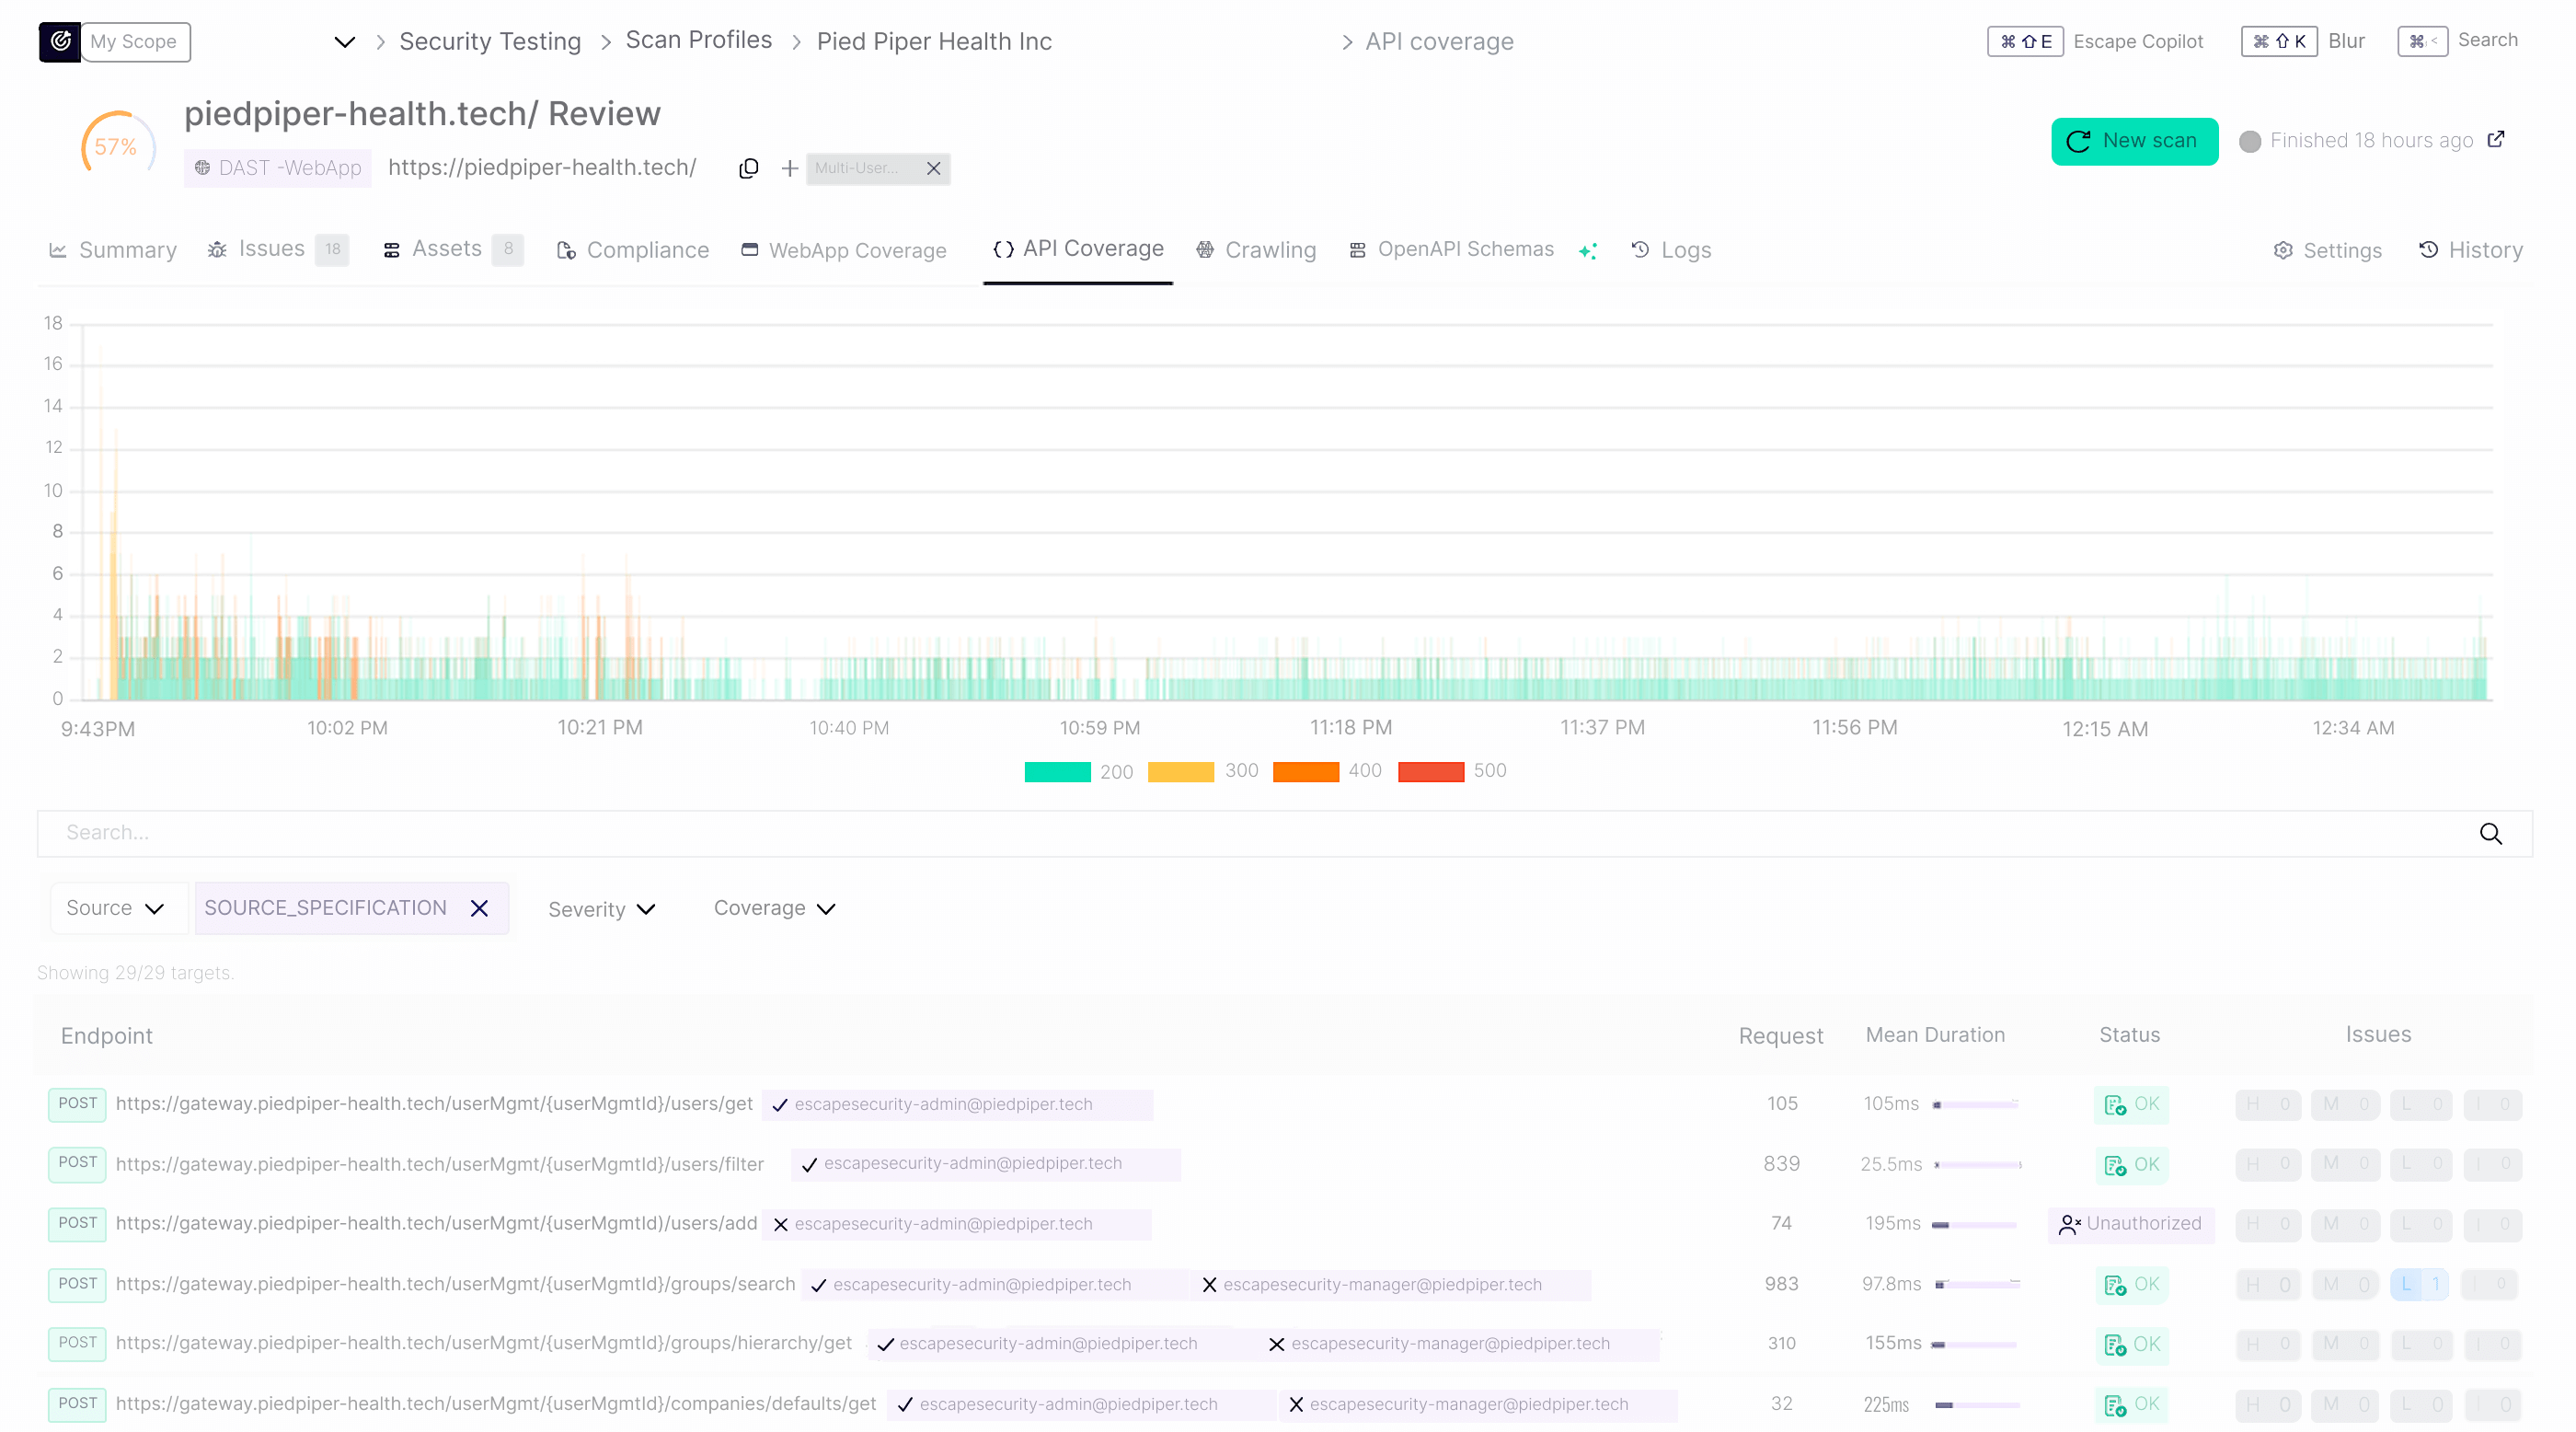
In the example above, the crawler successfully authenticated as an admin user but not as a secondary user within the API URL associated with a web application.
Below is a configuration example:
authentication:
  presets:
    - type: browser_agent
      users:
        - username: escapesecurity+admin@piedpiper.com
          main_user: true
          password: 123yesitsthatsimple
        - username: escapesecurity+manager@piedpiper.com
          password: 456yesitsthatsimple
      login_url: https://piedpiper-health.tech/login/
      auto_extraction_urls:
        - https://gateway.piedpiper-health.tech/
security_tests:
  tenant_isolation:
    skip: false
main_user: escapesecurity+admin@piedpiper.comauto_extraction_urlsin the configuration above is s a list of API URLs to auto-extract requests headers from. Extracted headers will be injected automatically into every single authenticated request sent by the scanner. This is particularly useful when authentication API scans using Browser-based authentication. If left empty, the auto-extraction URLs are derived automatically from captured API traffic.This per-user visibility helps confirm that privileged endpoints were only accessed by the correct accounts and that lower-privilege users couldn’t reach unauthorized resources — a critical step in validating both coverage and role separation in real-world multi-user scenarios.
Key Takeaways for Testing Multi-User Applications
Single-user security testing is no longer sufficient for modern applications. Race conditions, broken access control, and tenant isolation failures only surface when multiple users interact with the system simultaneously.
The patterns covered in this guide address the most common authorization vulnerabilities: symmetric tenant isolation, asymmetric privilege escalation, consolidated multi-vector testing, and bidirectional access validation. Each configuration targets a specific class of vulnerability that traditional DAST tools miss entirely.
You don’t need to test everything at once. Start with the pattern that matches your architecture:
- Multi-tenant SaaS: prioritize tenant isolation testing
- Role-based systems: focus on privilege escalation
- Complex applications: use multi-user patterns for consolidated coverage
For small security teams, this is where leverage matters.
Multi-user testing with Escape DAST amplifies your team’s impact, catching vulnerabilities across users, roles, and tenants that single-user testing in legacy DAST would miss.
You can repurpose your bug bounty reports to test for these vulnerabilities at scale within Escape, and, by integrating each scan profile directly into your CI/CD pipeline, you can run these tests on every deployment without extra effort, freeing your team to focus on remediation and higher-value security work.
💡 Want to get more out of Escape? Explore these guides to optimize your workflows, save time, and make your DAST testing even more efficient: