How to automate and secure deployment within GitLab CI with Syft and Grype

Ensuring the security of your code is paramount in today's fast-paced development landscape. Thankfully, the automation capabilities of CI/CD pipelines can make this process seamless. In this article, we'll guide you through setting up a GitLab CI pipeline that automates code security checks, allowing you to focus on your code with the assurance that you'll only be alerted when your attention is required.
What is GitLab, and what is GitLab CI?
GitLab is a Git hosting service. For more than 8 years, they have been pushing CI/CD to be part of any developer experience.
This article will leverage the Gitlab CI documentation to build secure and reliable software without human interaction needed.
Setting up your GitLab CI pipeline
First of all, you need to choose your deployment strategy. Depending on if you use a monorepo or not, you work with trunk or feature branches, you can choose to deploy on every commit or only on merge requests.
This article focuses on a simple deployment strategy: deploying on every commit to master.
Here are the stages we'll use:
stages:
  - build
  - sast
  - deploy
Each stage is a step in your pipeline. If a job fails, the pipeline will stop, and you'll be notified.
Choosing the Docker registry
As we want to deploy to Kubernetes, we will need a container registry. GitLab automatically creates a registry scoped to your repository name: Go to Deploy > Container Registry when you are on your repository page.
If you prefer, you can use another registry like Docker hub or any cloud provider registry.
In this tutorial, we'll assume DOCKER_IMAGE environment variable as your registry target.
Building your app
As your app is ready to be built, you don't want to do it manually after each commit. This is where GitLab CI comes in action.
As GitLab CI runners are using Docker we can't use docker build inside them. This requires a Docker-in-Docker setup that is not secure, as the runner can take control of the current host.
To solve this problem, Google created another image builder named kaniko to build our image without the privileged access needed.
Build docker image:
  stage: build
  image:
    name: gcr.io/kaniko-project/executor:debug
    entrypoint: [""]
  variables:
    DOCKER_IMAGE: registry.gitlab.com/your-namespace/your-repo/your-image-name
  script:
    - /kaniko/executor
      --context $CI_PROJECT_DIR
      --dockerfile $CI_PROJECT_DIR/Dockerfile
      --destination $DOCKER_IMAGE:latest
  only:
    refs:
      - master
Checking for vulnerabilities
Now your app is containerized, we can check for vulnerabilities. A 2023 survey from Sysdig shows that 84% of images contain some vulnerabilities. It can be due to outdated dependencies or to a vulnerable base image.
To test vulnerabilities, we will use two tools: syft & grype.
- Syft will produce a
sbomfile : a list of all dependencies used in your image. - Grype will check for vulnerabilities from your
sbomfile.
The advantage of using sbom files is that you can check them regularly, and it's way faster than scanning the whole image.
Syft:
  stage: sast
  image:
    name: nixos/nix:latest
    entrypoint: [""]
  variables:
    DOCKER_IMAGE: registry.gitlab.com/your-namespace/your-repo/your-image-name
    # Setting up the registry credentials
    SYFT_REGISTRY_AUTH_USERNAME: ${CI_REGISTRY_USER}
    SYFT_REGISTRY_AUTH_PASSWORD: ${CI_REGISTRY_PASSWORD}
  script:
    - nix-shell -p syft --run "syft ${DOCKER_IMAGE}:latest --output cyclonedx-json=sbom.json"
  artifacts:
    paths:
      - sbom.json
    when: on_success
    expire_in: "30 days"
  only:
    refs:
      - master

Grype:
  stage: sast
  image:
    name: nixos/nix:latest
    entrypoint: [""]
  needs:
    - job: Syft
      artifacts: true
  script:
    - nix-shell -p grype --run 'grype --fail-on Critical sbom:sbom.json'
  only:
    refs:
      - master
Here, we are leveraging the power of nix to install the tools. These two programs are available as docker images, but as they derive from scratch images, we can't use them with GitLab CI. Scratch images are empty images, so it profoundly reduces the size of the image alongside the attack surface! If you are compiling a binary for your app (Rust, Golang, etc...) it's better to use multistage builds to never ship compilers and another program in the production environment.
By running this pipeline, you'll get a list of vulnerabilities in your image. You will be surprised by the number of vulnerabilities you can find!
As an example, I'm scanning the well-known nginx image, and I get some critical vulnerabilities on tags pushed less than a month ago.
$ nix-shell -p grype --run "grype nginx:mainline-alpine3.17-perl" | grep -vE 'Negligible|Low|Medium'
 ✔ Vulnerability DB        [no update available]
New version of grype is available: 0.68.0 (currently running: 0.54.0)
 ✔ Loaded image
 ✔ Parsed image
 ✔ Cataloged packages      [65 packages]
 ✔ Scanned image           [12 vulnerabilities]
NAME           INSTALLED   FIXED-IN  TYPE  VULNERABILITY   SEVERITY
busybox        1.35.0-r29            apk   CVE-2022-48174  Critical
busybox-binsh  1.35.0-r29            apk   CVE-2022-48174  Critical
libcrypto3     3.0.10-r0             apk   CVE-2023-4807   High
libssl3        3.0.10-r0             apk   CVE-2023-4807   High
libwebp        1.2.4-r2    1.2.4-r3  apk   CVE-2023-4863   Unknown
perl           5.36.0-r2             apk   CVE-2023-31484  High
perl           5.36.0-r2             apk   CVE-2023-31486  High
ssl_client     1.35.0-r29            apk   CVE-2022-48174  Critical
Deployment
Now that your image is built and secure, you can deploy it to Kubernetes. Let's assume you have a Kubernetes cluster with a simple deployment.
A simple way to do it is to tag your image as latest in the podSpec and set the imagePullPolicy to Always to your deployment.
apiVersion: apps/v1
kind: Deployment
metadata:
  name: backend
  labels:
    app.kubernetes.io/name: backend
    app.kubernetes.io/image: your-image-name
spec:
  replicas: 2
  selector:
    matchLabels:
      app.kubernetes.io/name: backend
      app.kubernetes.io/image: your-image-name
  template:
    metadata:
      labels:
        app.kubernetes.io/name: backend
        app.kubernetes.io/image: your-image-name
    spec:
      containers:
        - name: backend
          image: registry.gitlab.com/your-namespace/your-repo/your-image-name
          imagePullPolicy: Always
Note that we are setting the app.kubernetes.io/image label, it will be used to roll out all deployments with the same image with only one command. The rollout command can take an extra flag --selector that will allow you to roll out all deployments with the same label.
$ kubectl rollout restart deployment -l "app.kubernetes.io/image=your-image-name"
deployment.apps/backend restarted
deployment.apps/frontend restarted
It will be useful when you have a lot of deployments with the same image and want to always be sure that all images are up to date.
Principle of least privilege
Following the principle of least privilege, we will create a service account with only the permissions needed to deploy our app.
We will create a service account with the following permissions:
- list deployments to get them with the label
app.kubernetes.io/image - rollout selected deployments
apiVersion: v1
kind: ServiceAccount
metadata:
  name: rollout
secrets:
- name: rollout
---
apiVersion: rbac.authorization.k8s.io/v1
kind: Role
metadata:
  name: rollout
rules:
  - verbs:
      - list
      - get
      - patch
    apiGroups:
      - apps
      - extensions
    resources:
      - deployments
---
apiVersion: rbac.authorization.k8s.io/v1
kind: RoleBinding
metadata:
  name: rollout
subjects:
  - kind: ServiceAccount
    name: rollout
    namespace: default
roleRef:
  apiGroup: rbac.authorization.k8s.io
  kind: Role
  name: rollout
Now, you need to create the kubeconfig file and place it in your GitLab secrets.
cat <<EOF
---
apiVersion: v1
kind: Config
clusters:
  - name: cluster
    cluster:
      certificate-authority-data: $(kubectl config view --minify --output jsonpath='{.clusters[*].cluster.certificate-authority-data}' --raw)
      server: $(kubectl config view --minify --output jsonpath='{.clusters[*].cluster.server}')
contexts:
  - name: context
    context:
      cluster: cluster
      user: rollout
current-context: context
users:
  - name: rollout
    user:
      token: $(kubectl create token rollout)
EOF
And we can use this kubeconfig to deploy our app.
Deploy on K8S:
  stage: deploy
  image:
    name: bitnami/kubectl
    entrypoint: [""]
  script:
    - kubectl rollout restart deployment -l "app.kubernetes.io/image=your-image-name"
  only:
    refs:
      - master
Your app will be built, checked, and deployed on every commit.
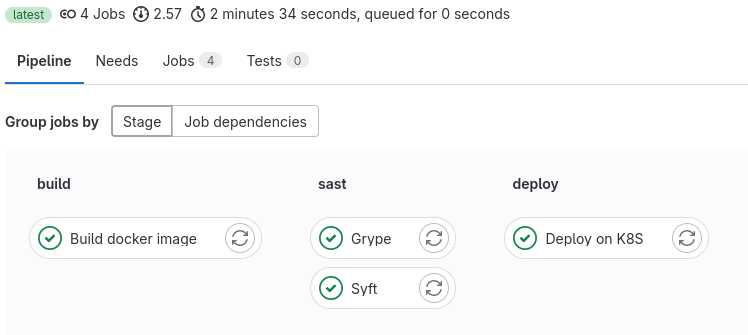
Here, my pipeline is really fast as it's not a real app, but as you can see, adding security to it doesn't take much time (less than 2 minutes). Adding it before your production deployment can save you from a lot of trouble.
Conclusion
Here are the key takeaways from our journey:
- Just like continuous deployment, your security measures should be ongoing and integrated into your workflow.
- Apply Principle of Least Privilege : anytime you give privileges, ask you if you really need to.
kanikoallows you to build docker images without a privileged environment (here is the GitLab example).- Even popular base images like
nginxandgolangcan harbor vulnerabilities, so always be vigilant. - Reduce attack surface via mutli stages docker builds.
If you want to dive deep into this subject, consider scanning vulnerabilities in your merge requests and validating them even before a code review. It's a proactive step toward bulletproofing your applications. Happy coding, and stay secure!
💡Interested in other tech tutorials? Check out the selection of articles below: