Rendering emails with Svelte
We recently rebuilt our whole email stack from scratch to improve the developer experience: we now have an instant feedback loop, leveraging a SvelteKit-powered dev server.

Emails are the cornerstone of automated internet communication. Create an account on a website? Email. Receive an invoice? Email. Sign up for an event? Email. As a developer, you will need to send emails at some point. And you will end up working with some of the most legacy web technologies.
We, at Escape, recently rebuilt our whole email stack from scratch to improve the developer experience: we used to send emails to preview them, whereas now, we have an instant feedback loop, leveraging a SvelteKit-powered dev server.
Emails are written with 2003 HTML
If you started web development before 2000, chances are you worked on websites designed with <table>-based layouts. It was the way to design complex two-dimensional layouts.

Well, unfortunately for us, email clients are still stuck in the dark ages. We, therefore, have four possibilities to write emails:
-
Write them by hand and learn the quirks of the old
<table>-based layout system with loads of<!--[if mso]>and inline styles. This is way too slow for a company, but there is a lot to learn on the way. I might have picked this approach for a personal project. -
Send plain text emails, like good ol' text messages. Not possible for Escape, but you might consider it.

Source: Email on Acid -
Use a WYSIWYG email editor. There are a lot out there! Turns out emails are hard to design. It would work well for static emails with a few string interpolations, but not for dynamic emails with a lot of logic, which we need. Depending on what you want to achieve, this might be the best option.

Source: Unlayer.com -
Use an XML-based email templating language. There are plenty too! This is the path we took because it is the most flexible and powerful option.
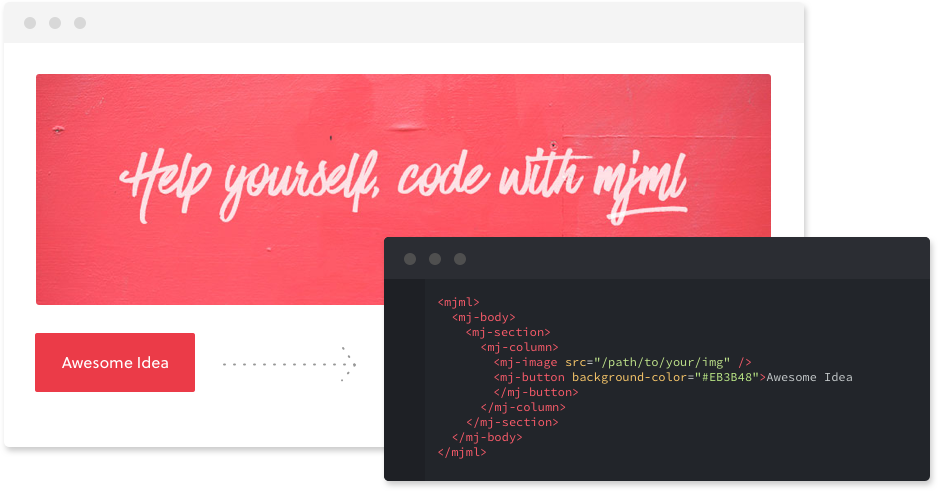
Source: MJML.io
Because we had some experience with MJML we decided to stick with it. It is battle-tested, has a lot of features, and is easy to learn.
We now need a way to make these emails dynamic, with logic and string interpolation. The title probably ruined the surprise, but hey, we chose Svelte.
MJML, Svelte, Vite, Square pegs and Round holes
Our challenge now is not only to write MJML with Svelte but also to have a simple way to preview and test emails. All the technologies we mentioned were never meant to work together, but there seemed to be a way.
Here is our plan:
-
We would write Svelte code with MJML elements:
<script lang="ts"> export let name = "World"; </script> <mj-section> <mj-column> <mj-text font-size="32px" color="#F45E43" font-family="helvetica"> Hello {name}! </mj-text> <mj-divider border-color="#F45E43" /> </mj-column> </mj-section> -
We would compile the Svelte code to HTML using the compiler's SSR capabilities:
const mail = (props) => `<mj-section> <mj-column> <mj-text font-size="32px" color="#F45E43" font-family="helvetica"> Hello ${props.name}! </mj-text> <mj-divider border-color="#F45E43" /> </mj-column> </mj-section>`; -
We would feed this to the MJML compiler:
const document = (body) => `<mjml> <mj-head><!-- Other head properties --></mj-head> <mj-body>${body}</mj-body> </mjml>`; const html = mjml2html(document(mail({ name: "World" }))); -
We would send the resulting HTML:
let transporter = nodemailer.createTransport();

await transporter.sendMail({
  from: "support@example.com",
  to: "client@example.com",
  subject: "Hello!",
  html,
});
Apart from that, we also want:
- A way to preview the emails, and the easiest way to get live-reload in a Svelte project is to use SvelteKit.
- Compile-time type checking for props, which is made possible by svelte2tsx.
Our setup will be in two parts:
- Setting up a development server to create and preview emails.
- Setting up a build pipeline to compile emails to HTML strings.
The dev server
SvelteKit offers a fantastic developer experience to work with Svelte and was just released as stable, so it is a no-brainer to use it.
You can clone the whole experiment from GitHub. We will go through the most interesting parts in the rest of the article.
You will find a complete SvelteKit project in packages/svelte-emails:
-
index.ts: This is our library entry point.// Export the renderer export { render } from "./lib/index.js"; // Also export compiled Svelte components export * from "./mails/index.js"; -
lib/-
Header.svelte: This is our common email header. MJML offers a lot of components out of the box.<mj-section> <mj-column> <mj-text align="center" font-size="20px" font-family="Helvetica"> <!-- Svelte slot here! --> <slot /> </mj-text> <mj-divider border-color="#ff3e00" /> </mj-column> </mj-section> -
index.ts: It contains the MJML rendering logic./** Renders a Svelte component as email-ready HTML. */ export const render = <Props>( component: new (...args) => SvelteComponentTyped<Props>, props: Props ) => { // Render the component to MJML const { html: body, css, head } = component.render(props); const mjml = `<mjml> <mj-head> ${head} <mj-style>${css.code}</mj-style> </mj-head> <mj-body>${body}</mj-body> </mjml>`; // Render MJML to HTML const { html } = mjml2html(mjml); return html; };
-
-
mails/: This is the root HTTP directory, and it will also contain our emails.-
index.ts: This file reexports all the emails.export { default as HelloWorld } from "./hello-world/Mail.svelte"; -
hello-world/-
Mail.svelte: Make a guess!<script lang="ts"> import Header from "$lib/Header.svelte"; export let name: string; </script> <Header>Hello {name}!</Header> <mj-section> <mj-column> <mj-button color="#fff" background-color="#ff3e00" font-family="Helvetica" href="https://svelte.dev" > Learn Svelte </mj-button> </mj-column> </mj-section> -
+page.server.tsand+page.svelte: These are our development email previews, powered by Vite.export const load = async () => ({ email: render(Mail, { // This is type-checked! name: "World", }), });
-
-
That is quite a lot of code! Let's try it out:
# Start the dev server
yarn dev
Go to localhost:5173/hello-world to see the email preview, and edit anything to see it update in real-time.

The build pipeline
We now have a working development environment, but we need to build our emails for production. We will use Rollup to bundle our emails, and svelte2tsx to emit type declarations.
The rollup.config.js file defines our build pipeline:
export default {
  input: "src/mails/index.ts",
  plugins: [
    {
      /** Export component's types at the end of the build. */
      name: "rollup-plugin-svelte2dts",
      async buildEnd() {
        const require = createRequire(import.meta.url);

        // All the heavy lifting is done by svelte2tsx
        await emitDts({
          svelteShimsPath: require.resolve("svelte2tsx/svelte-shims.d.ts"),
          declarationDir: "build",
        });

        // We need to replace `.svelte` with `.svelte.js` for types to be resolved
        const index = "build/mails/index.d.ts";
        const code = await readFile(index, "utf-8");
        await writeFile(index, code.replaceAll(".svelte", ".svelte.js"));
      },
    },
    svelte({
      ...svelteConfig,
      compilerOptions: { generate: "ssr" },
      emitCss: false,
    }),
  ],
};
Run yarn build to transform the Svelte emails components into raw JavaScript.
Wrapping up
Using our built emails in a NodeJS app is as simple as:
import { render, HelloWorld } from "svelte-emails";

const html = render(HelloWorld, {
  // This is type-checked!
  name: "World",
});
console.log(html);
There is a demo package in the repo for you to try out.
This concludes this experiment. We are still tinkering with a few things to make it easier to use, but we hope you enjoyed this article. Feel free to ask questions or give feedback on how you are currently developing emails, we are eager to hear from you!
Food for thoughts
💡 Wanna learn more about code quality? Read our blog article "GraphQL errors: the Good, the Bad and the Ugly".